HOOKE'S LAW Introduction In physics, Hooke's Law is one of the fundamental principles governing how objects deform under external forces . Named after the 17th-century British physicist Robert Hooke, this law provides a crucial understanding of the behavior of elastic materials, such as springs and rubber bands. Whether stretching a rubber band or compressing a spring, Hooke's Law helps explain what happens when forces act on these materials. What is Hooke's Law: Hooke's Law states that the force F needed to extend or compress a spring by some distance x is proportional to that distance. Mathematically, it is expressed as: F= -kx Here k represents the spring constant, which is the measure of the stiffness of the spring, and x is the displacement from the displacement position. The negative sign indicates that the force exerted by the spring is in the opposite direction of the displacement. Understanding the Spring Constant: The spring constant k is a critical co...
Vernier Calipers
Vernier Calipers are measuring instruments which can measure mainly diameter of the circular objects.
They can take smallest reading up to 0.01cm which is known as its Least Count.
They are of two types:
Analog Vernier Calipers
Digital Vernier calipers
Below Figure (i) Shows Analog Vernier Caliper while figure (ii) shows Digital Vernier Calipers.
 |
| Figure (i): Analog Vernier Caliper |
Figure(ii): Digital Vernier Calipers
In this lecture we will be focusing on Analog Vernier Calipers .
CONSTRUCTION OF VERNIER CALIPERS:
It consisted on two scales (i) Main Scale and (ii)Vernier Scale.
- Main Scale (MS):
Main Scale is marked in Millimeters usually.
- Vernier Scale (VS):
It slides over the the Main Scale.
It contains two jaws:
- Upper Jaws
- Lower Jaws
Lower Jaws: The Scale has two Lower Jaws which are used to measure the outer diameter of any object.
Usually the object is placed between both the jaws and measurement is taken.
LEAST COUNT OF VERNIER SCALE:
Least Count of any instrument is the smallest reading it can take. (OR) How much smaller distance it can measure is known as its Least Count.
The Least Count of the Vernier Calipers can be calculated using the formula given below:
L.C of Vernier Calipers = (Smallest Reading on MS)/(Total Numbers of Divisions on the VS)
L.C of Vernier Calipers = 1mm/10 divisions = 0.1mm
L.C of Vernier Calipers = 0.1mm or 0.01cm
The least count of Vernier Calipers is 0.01cm respectively.
L.C stands for Least Count
MS stands for Main Scale
VS stands for Vernier Scale
Usually Least Counts of the Vernier Calipers are written on the Vernier Calipers, so one can do measurement accordingly.
WORKING OF VERNIER CALIPERS:
The Working of Vernier Calipers or the method of taking reading is illustrated below:
- First of all find the zero error of the Vernier calipers.
Zero Error of any equipment is an error when you're taking any reading and you're measuring zero while your instrument reads a non-zero reading.
How to find Zero error?
To find zero error close both the jaws of Vernier Caliper.
If zero of the Main Scale coincide with the zero of the Vernier Scale then there will not be any zero error.
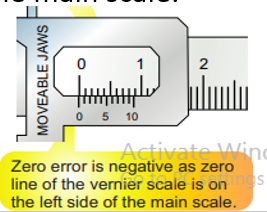
If zero of the Main Scale does not coincide with the zero of the Vernier Scale then there will be zero error occurred.
There are two types of Zero error:
 |
| Fig: No Zero Error |
- Positive Zero Error
- Negative Zero Error
If the zero of the Vernier Scale is on the left of the zero of the main scale then it is called as Negative Zero Error as shown.
Now after checking the zero error of the instrument you can move to do measurement through that instrument.- Now Place the Object between the jaws of the Vernier Caliper.
- Fix the jaws using Bolt on the top.
- Take Main Scale reading by counting the number of lines on the main scale after division on the right side of the zero of the Vernier Scale.
- Now check the Vernier scale's line coinciding with the line of the main scale.
- Now multiply the digit on the Vernier scale which is coinciding with the main scale in above figure 6 digit line is coinciding with the main scale so, multiply it with the least count of the Vernier caliper and then add resultant with the main scale reading.
- If there exist zero error then two possibilities arises:
- Positive Zero Error, in this case the error value should be deducted from total measurement.
- Negative Zero error, in this case the error value will be added to the final calculated value.
Measurement of Vernier Calipers= (Main Scale reading)+(Vernier Scale reading x L.C)
For Ppt Click Below:
Download PPT


Comments
Post a Comment